略
众所周知,Markdown 文档需要图床作为支持,才能在互联网中方便的共享。在图床平台里,七牛云深得大家推荐,可弊端也很明显,需要手机号注册(貌似还需要域名备案?),大陆服务的通病吧。个人对这个颇有芥蒂,生怕不小心分享了一些越界内容被抓到小辫辫。另外还有一些免费的小网站提供图床,又担心随时可能停服关门,数据丢了就太可惜了。
直到今天无意间发现自己用的 MWeb 笔记软件有自定义图床,索性写个服务尝试了一下,整个过程很简单,如果大家对安全性/隐私性要求高,且用的 markdown 编辑软件提供如图“自定义图床”这样的功能,不妨一试~
图床服务代码
图床服务使用 golang + gin 框架实现,创建项目:
mkdir picture_bed
cd picture_bed

# 初始化
项目
go mod init github.com/xxxx/xxxxx

# 下载依赖
go get github.com/gin-gonic/gin
go get github.com/satori/go.uuid

# 创建main代码
touch main.go
完整代码 :
package main

import (
	"fmt"
	"log"
	"net/http"
	"os"
	"path/filepath"
	"regexp"
	"time"

	"github.com/gin-gonic/gin"
	uuid "github.com/satori/go.uuid"
)

var (
	uploadAPIPath   = "/"
	downloadAPIPath = "/"
	dst             = "/data/upload"
	token           = "自定义你的token"

	reg = regexp.MustCompile(`.*?(\.\w+)$`)
)

func main() {
	gin.SetMode(gin.ReleaseMode)

	fmt.Println("hello")
	g := gin.New()

	g.Handle(http.MethodPost, uploadAPIPath, func(c *gin.Context) {
		if c.GetHeader("token") != token {
			c.String(http.StatusUnauthorized, "token wrong")
			return
		}
		// 单文件
		file, err := c.FormFile("file")
		if err != nil {
			c.String(http.StatusBadRequest, "no file found in form:file")
			return
		}
		log.Println(file.Filename)
		// 上传文件到指定的路径
		filename := randomFileName(file.Filename)
		fileURLPath := "/" + filepath.Join(time.Now().Format("2006/01/02"))
		err = os.MkdirAll(filepath.Join(dst, fileURLPath), 0755)
		if err != nil {
			c.String(http.StatusInternalServerError, fmt.Sprintf("upload got error: %v", err))
			fmt.Println("error:", err)
		}
		fileURLPath = filepath.Join(fileURLPath, filename)
		absPath := filepath.Join(dst, fileURLPath)
		err = c.SaveUploadedFile(file, absPath)
		if err != nil {
			c.String(http.StatusInternalServerError, fmt.Sprintf("upload got error: %v", err))
			fmt.Println("error:", err)
		} else {
			c.String(http.StatusOK, fmt.Sprintf("{\"url\":\"%s\"}", fileURLPath))
			fmt.Println(fmt.Sprintf("{\"url\":\"%s\"}", fileURLPath))
		}
	})
	g.Static(downloadAPIPath, dst)
	log.Fatal(g.Run("127.0.0.1:8090"))
}

func randomFileName(filename string) string {
	u := uuid.NewV4()

	match := reg.FindAllStringSubmatch(filename, -1)
	if len(match) == 0 {
		return u.String() + filename
	}
	return u.String() + match[0][1]
}
其中端口8090和上传文件存放路径/data/upload/暂时写死在代码里,大家可酌情更改。
编译:
env GOOS=linux go build
部署到 linux 服务器中
将编译后的文件上传到服务器中,并添加执行权限,创建 systemctl 文件,以 Ubuntu 20.04 为例,文件放在/usr/local/bin/uploader中。systemctl 文件路径:
/lib/systemd/system/uploader.service
内容:
[Unit]
Description=uploader service port 8090
Documentation=man:uuidd(8)

[Service]
ExecStart=/usr/local/bin/uploader
Restart=no
User=root
Group=root
#ProtectSystem=strict
#ProtectHome=yes
加载配置,启动
systemctl daemon-reload
systemctl restart uploader
使用域名代理: 安装 nginx,并添加配置:
server {
    listen      80;
    server_name file.fengxu.im;
    access_log  /var/log/git-access.log;
    location / {
        proxy_pass          http://127.0.0.1:8090;
        proxy_set_header    Host  $host;
        proxy_set_header    x-Forwarded-For $http_x_forwarded_for;
        proxy_redirect      off;
    }
}
记得修改域名为你自己的。重新加载 nginx 配置即生效。 域名使用 80 端口,若想使用 https 服务,需要生成 https 证书,后面更新相关文档。
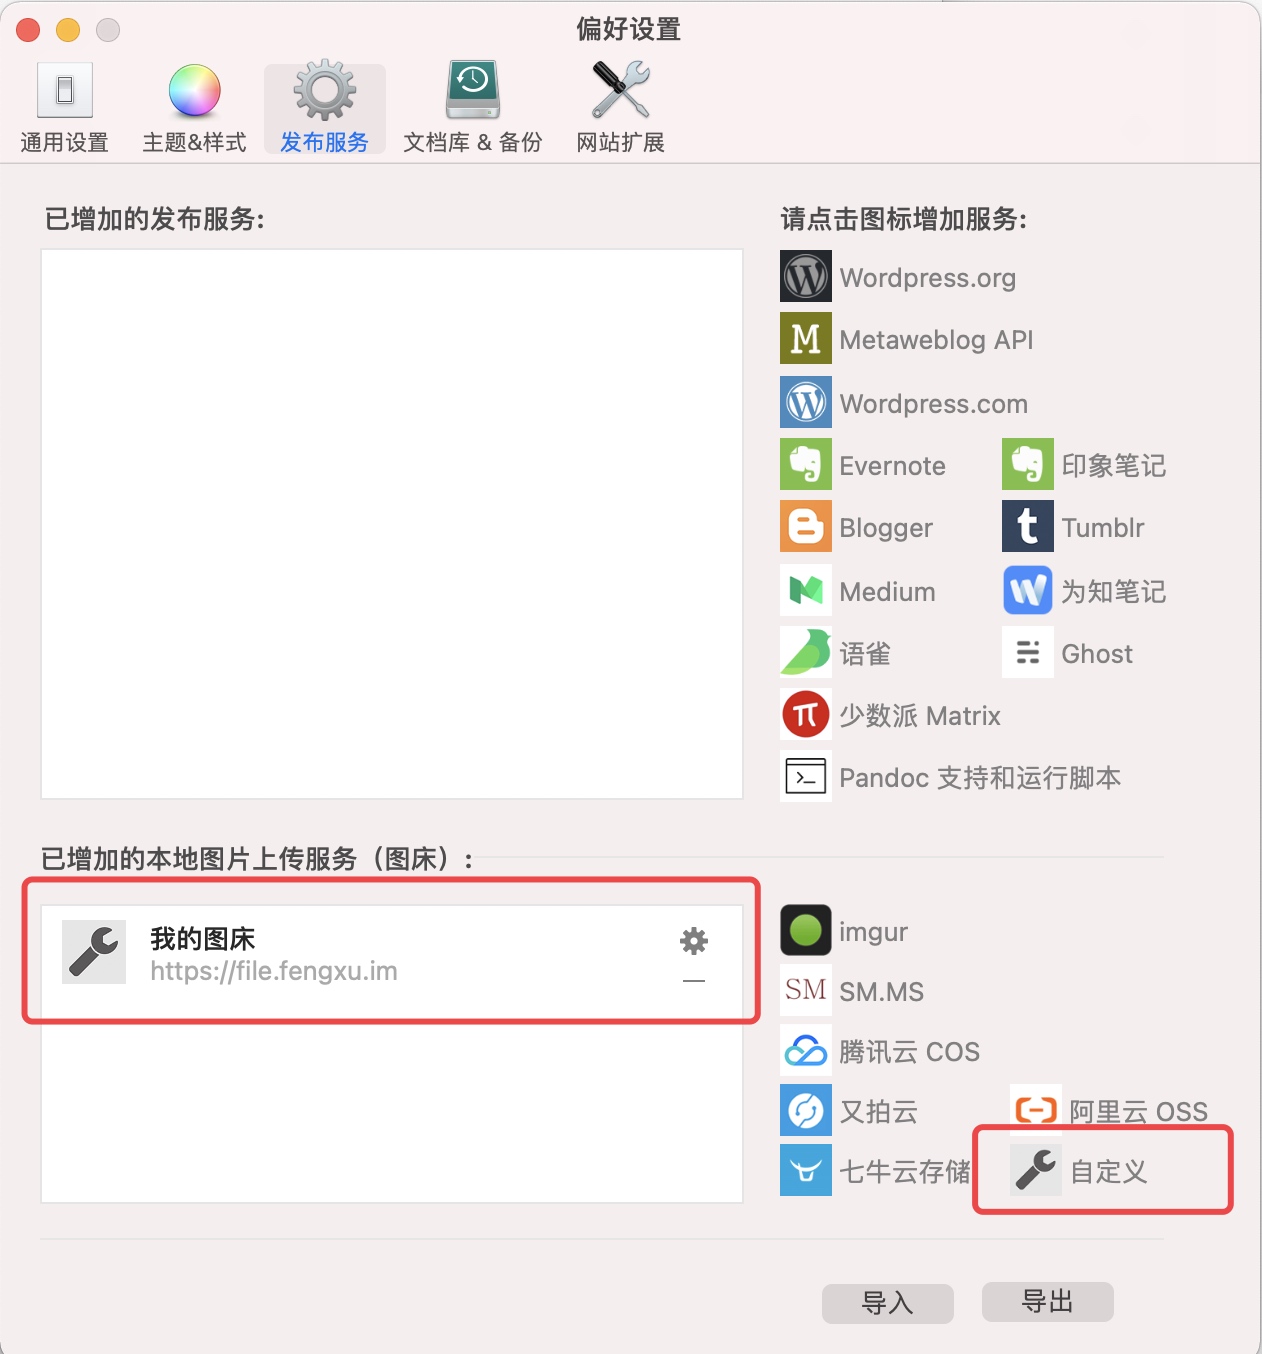
和 MWeb 软件整合
依次进入首选项 - 发布服务 - 图床 - 自定义,按你的服务域名填写对应项:
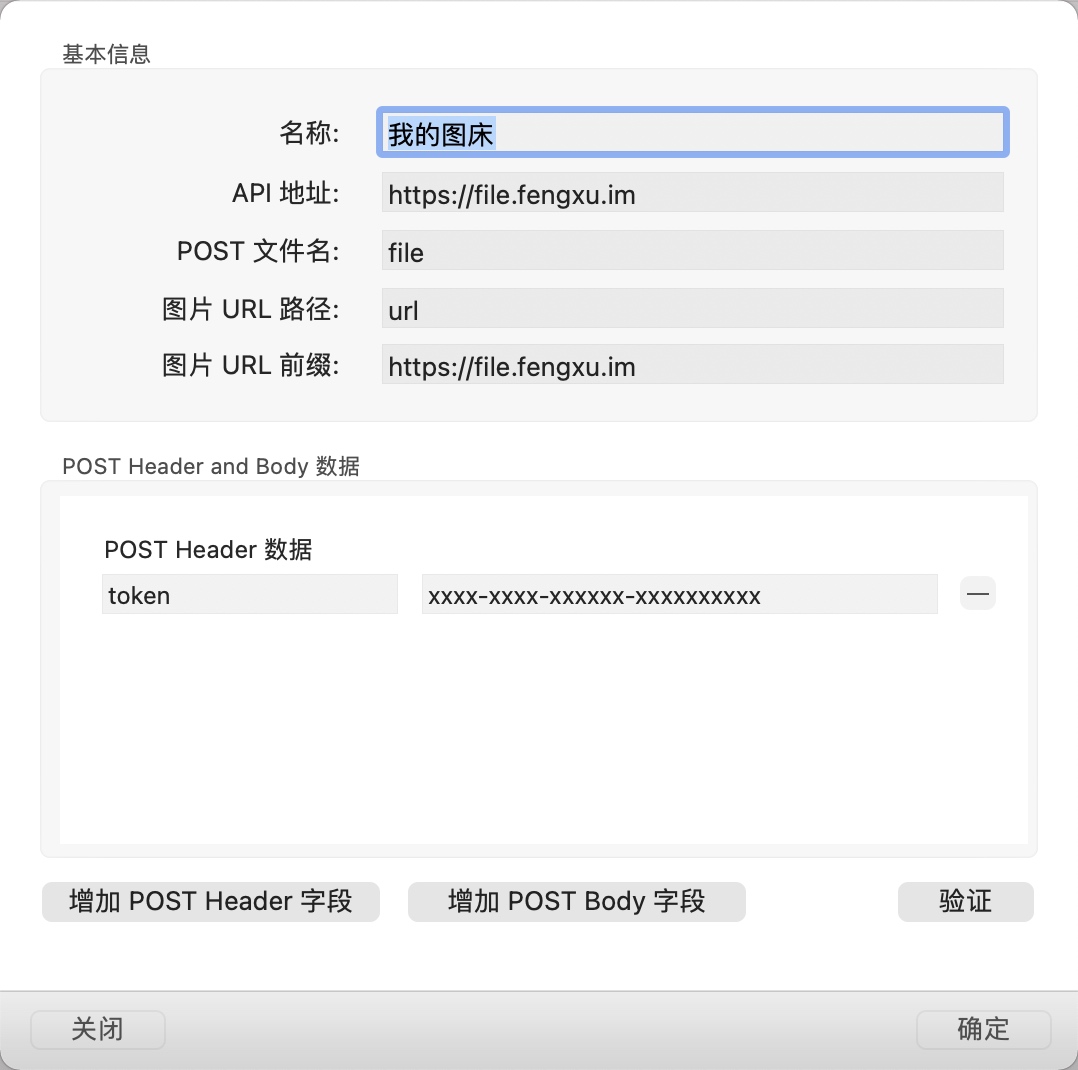
注意修改 API 地址/域名前缀/token 等信息。
保存后,在 MWeb 的外部文档模式(command + E)右键点击需要使用图床的文件夹,点击“编辑”:
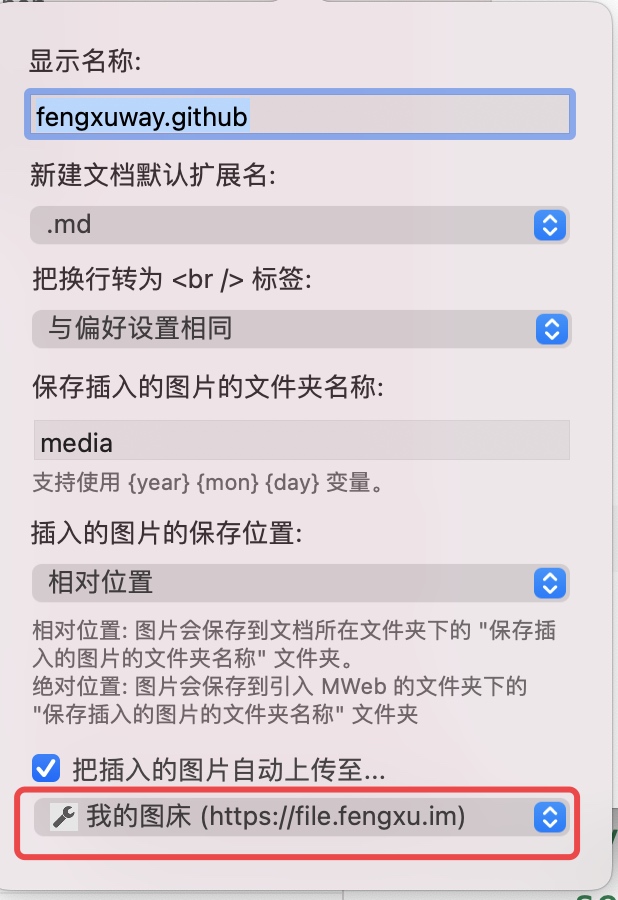
选中刚刚创建的图床就可以了。编辑文档时直接粘贴图片,即自动上传并生成图片链接。